 |
 |
| SV Talk, Tuning & Tweaking Discussion and chat on all topics and technical stuff related to the SV650 and SV1000 Need Help: Try Searching before posting |
 |
|
|
Thread Tools |
 13-04-20, 05:30 PM
|
#1 |
|
Member
Join Date: Oct 2015
Location: Hertfordshire, UK
Posts: 141
|
Heres a bit of a guide of how I removed the swingarm and renewed the chain and sprockets on my 2005 SV650s. I went for an endless chain as I didnt have a chain breaker or riveter and as I was removing the swingarm I thought theres no point in getting one as I can just buy an endless chain. I know ive gone the hard way round but I like a challenge lol. Its my first write up and guide so its probably not going to be the best but its just a guide on how I carried the work out.
Firstly I put my bike up using a ABBA stand with the swingarm removal kit which I highly recommend getting if your wanting the remove the swingarm as it makes it easier. 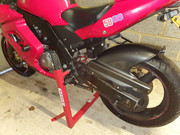 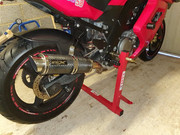 I removed my front side fairings to give me better access to the exhaust then took off my exhaust end can and rear hugger. 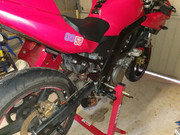 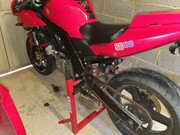 I then tackled removing the exhaust system, first I undone the clamp that connects the system to the rear downpipe  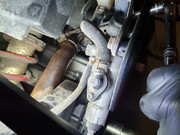 Then undone the clamp connecting the system to the front downpipe. 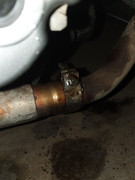 I then removed the bolts that secure the system to the frame. 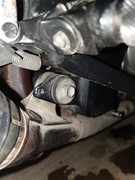 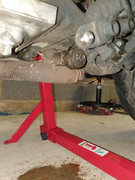 I tackled the front header bolts but knowing my luck they snapped which I thought might happen. I used heat and plus gas but they were gunked up with all road grime and dirt so didnt have much hope. I ended up getting my local motorbike shop to pick my bike up and drill the bolts out as I didnt fancy doing it myself. 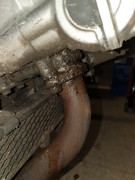 I removed the front sprocket cover noting how the bottom left bolt has wire with a clip that gets screwed on with the bolt to hold it in position and then un done the 2 bolts that secure the clutch mechanism 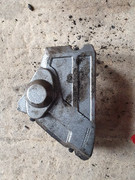 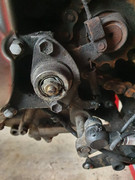 Then removed this plate that sits ontop on the mechanism and the spring then put it aside. 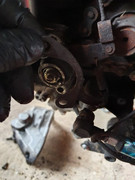 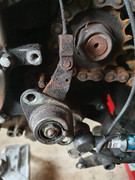 I then got my partner to press down on the rear brake while I used a breaker bar to undo the front sprocket nut and remove the nut and washer. 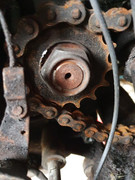 You could get some wood and put it in between the wheel and the swingarm to lock the wheel. Remove the rear wheel. Undo the rear sprocket nuts, I had to use a breaker bar for this. Once the nuts are un done the bolts will drop but dont panic. I put the new sprocket on and got a magnetic pen to grab the bolt and pulled it back up and got the washer and nut back on. Make sure the bolts are fully up as they have a semi circle head to sit in the recess so it doesnt spin, just pull and turn the bolt until its fully up, you will know when this is as it doesnt turn anymore. Do this for the other bolts and tighten to nuts up in a criss cross motion to the correct torque which is 60nm. Undo the nut that holds the dog bone to the swingarm. 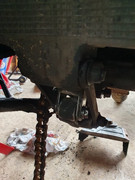 I supported the swingarm with some axle stands so it didnt drop. 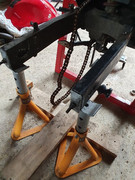 Then remove the bolt and let the dog bones hang. 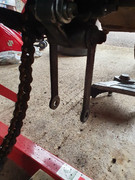 Undo the nut at the bottom of the shock absorber and remove, then undo the nut at the top of the shock absorber and remove but holding the shock so it doesnt drop. 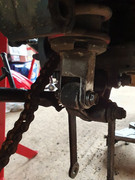 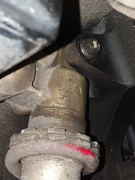 Loosen and remove the locknut on the right side of the bike on the swingarm pivot bolt, you will need a special tool for this which I brought off ebay for £20. 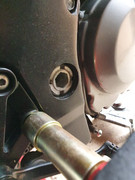 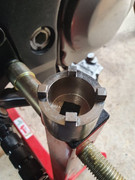 Loosen and remove the nut on the left side of the bike on the swingarm pivot bolt. 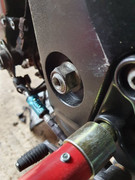 Using a 19mm allen socket undo the swingarm pivot bolt and withdraw the bolt from the right hand side of the bike. 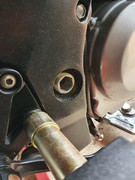 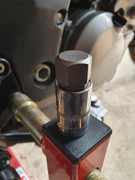 Make sure you support the swingarm so it doesnt drop. Then noting how the chain goes round the swingarm manoeuvre the chain out and remove the swingarm. 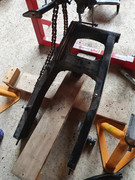 Check the condition of the chain slider, mine was shot so needed a new one.  I inspected the bearings and spacers in the swingarm and they seemed ok so just cleaned it all up and regreased it. The swingarm pivot bolt was dry so cleaned that all up and regreased. 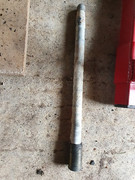 While I was cleaning and regreasing I checked the suspension linkage spacers and bearing and regreased all of them aswell. Now you can unhook the chain off the front sprocket and remove it. Then remove the front sprocket. Now the fun part of putting it all back together. Its basically in reverse so fit the new front sprocket and feed the new chain onto the front sprocket, fit the washer and hand tighten the front sprocket nut. Offer up the swingarm to where the swingarm pivot bolt goes through and manoeuvre the new chain so its sitting over the swingarm. Push the swingarm pivot bolt through the right hand side of the bike until it reaches where the threads start. Get the 19mm allen socket and start tightening the bolt. Then torque the pivot bolt to 15nm. Then on the left hand side of the bike fit and tighten the nut to 100nm. Then on the right hand side fit and tighten the locknut to 90nm. Fit the shock absorber top bolt but only do this finger tight for now then fit the shock absorber bottom bolt through the suspension linkage and tighten this bolt up to 50nm then you can tighten the top bolt to 50nm aswell. Offer up the dog bones to the underside of the swingarm and tighten to bolt 78nm. Now fit the rear wheel back and hook the new chain onto the rear sprocket. You can tension the chain just so its fairly tight as you will tension the chain properly when the bikes on the ground, then tighten the rear wheel axle nut to 100nm. Now you can tighten the front sprocket nut to 145nm by either getting someone to press on the rear brake or get a bit of wood inbetween the rear wheel and swingarm. Then push down on the washer so its flat against one side of the nut to lock it in place just as a precaution. Now fit the clutch mechanism all back together and tighten the bolts. Fit the front sprocket cover and tighten the bolts remembering how the bottom left bolt had the wire with clip that tightens on with the bolt. Before fitting the exhaust I removed all old gaskets as there the mesh ones so best to replace them. I put the new gasket into the system where it secured onto the rear downpipe by applying a bit of exhaust paste to the gasket so it doesnt move when I slide it onto the rear downpipe. I then located the exhaust system back to the rear downpipe and located the 2 bolts which secure to the frame which I used Loctite on. I tightened the bolts to the frame then done the exhaust clamp to secure the system to the rear downpipe. I then fitted the new gasket in the system which connects to the front downpipe by again applying a bit of exhaust paste onto the gasket so it doesnt move when I slide the front downpipe on. I then located the new gasket in the port where the front downpipe locates into the front cylinder by applying a bit of exhaust paste so it doesnt fall out when locating the downpipe. I then located the front downpipe onto the system and hand tightened the bolts into the front cylinder. I tightened the exhaust clamp to secure the system onto the front downpipe then tightened the 2 bolts into the front cylinder to 23nm. Then I fitted the exhaust end can and rear mudguard and my fairings. I then cleaned and lubed the chain and then lowered the bike and tensioned the chain correctly.  I hope I havent written too much and confused anyone lol. Sorry I didnt take any pictures of cleaning and greasing the spacers and bearings and putting the bike back together I got a bit carried away. Hope this can help anyone who wants to do this in the future. Last edited by egcSV650s; 13-04-20 at 08:37 PM. |

|

|
|
14-04-20, 08:48 AM
|
#2 |
|
Member
Join Date: Oct 2007
Posts: 596
|
Thanks, good write up. Is it really necessary to take of the front down pipe as that seemed to be the hardest bit?
|
|
|
|
|
14-04-20, 09:55 AM
|
#3 |
|
Member
Mega Poster

Join Date: Dec 2015
Location: Bristol
Posts: 1,200
|
To remove the swingarm fully, it is yes. To drop it down and just do the linkage bearings you don't have to.
__________________
>>> ? <<< Past: Street Triple 765rs, DRZ400s,GSXR1000 K9, VFR800 A8, ZX6R 636 2006, CRF250L, GSXR750 K7, VFR800 A7, GSXR750 L3, Street Triple 675R, MT09 Tracer, SV650s K8, CB250rsd, YBR125... |
|
|
|
|
14-04-20, 11:27 AM
|
#4 |
|
Member
Join Date: Oct 2015
Location: Hertfordshire, UK
Posts: 141
|
Yes as Adam Ef said if your wanting to remove the swingarm fully then you have to as you cant get the exhaust system off without removing it. I did try myself but there wasnt enough play to wiggle it off the front header and the rear header at the same time
|
|
|
|
|
|
|
 Similar Threads
|
||||
| Thread | Thread Starter | Forum | Replies | Last Post |
| Chain & sprocket change help? | nikon70 | Bikes - Talk & Issues | 27 | 25-04-14 05:13 PM |
| chain and sprocket change? | Quiff Wichard | Bikes - Talk & Issues | 23 | 11-04-13 10:22 AM |
| chain and sprocket change | stephencassidy | SV Talk, Tuning & Tweaking | 17 | 05-09-09 03:18 PM |
| Chain Change - Remove Swingarm? | Coder | SV Talk, Tuning & Tweaking | 12 | 16-04-09 11:29 AM |
| Fairing Removal For Chain Change | COLZO | SV Talk, Tuning & Tweaking | 6 | 25-03-09 12:26 PM |
