 |
 |
 07-01-17, 01:04 PM
|
#51 |
|
Member

Join Date: Jun 2016
Location: Rochester,Kent.
Posts: 824
|
Sweet!
|

|

|
|
09-01-17, 11:41 AM
|
#52 | |
|
Member
Mega Poster

Join Date: Jun 2008
Location: West Lancs
Posts: 4,055
|
Quote:
I'm actually quite keen on the 250cc imports as they're far more accessible. |
|
|
|
|
|
22-01-17, 12:46 AM
|
#53 |
|
Member
Mega Poster

Join Date: Apr 2005
Location: Sunny Swindon
Posts: 3,570
|
Shocking developments... Can you see where this is going?
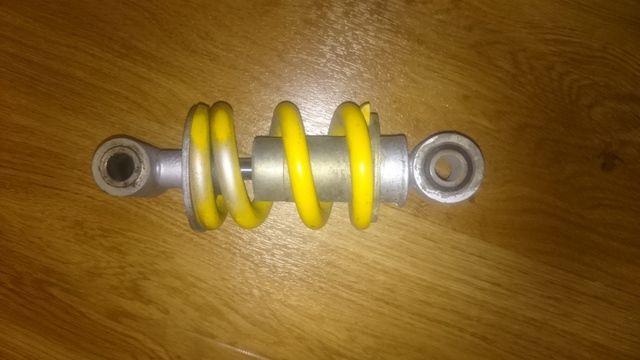 The original rear shock is somewhat underwhelming. Its going to be a basic budget shock and probably weighted for the Japanese home market, which would have suited me perfectly some 20 years ago. Its got over spray on the spring and will need a rebuild, but probably isn't a serviceable item. And in keeping with the builds goals this isn't going to do. The trouble is finding a replacement shock isn't as easy as you might think, the YSR was not exactly a best seller. However research showed that there are a few out there, "Fox Twin Clicker" is something that came up now and again and I did see one sell on eBay for something like $450. But if I were to buy that and ship it over then rebuild it if I could the price would land on the wrong side of interesting. I had heard that Ohlins made one, but they don't list it. Coincidentally I needed the Ohlins on my SV serviced so took that to MH Rracing and asked about getting a Ohlins for the YSR. Surprisingly he was familiar with the bike and shock but confirmed that it was no longer produced. However he'd see if he could build one from parts, but that came with the warning of it not being cheap. Unfortunately building from parts wasn't possible as some of the vital parts are simply not available any more. I did then think about contacting Nitron who produced my shock for the TZR for them to make me one but just as I was about to I struck a deal with a chap in America and a couple of weeks later a parcel arrived. 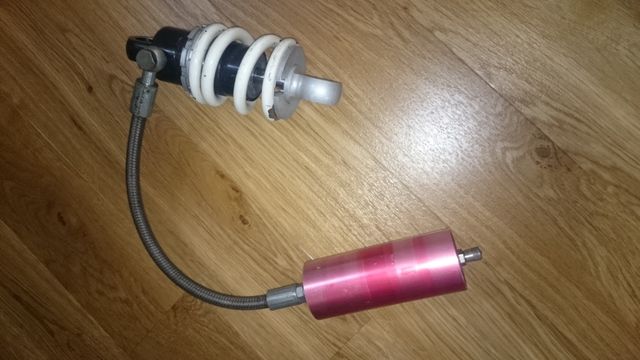 It is a WP shock model number W3990. But as expected it was in a bit of a sorry state. The anodising on the reservoir was faded. The powder coat on the spring was chipped. There was little to no oil or gas in it judging by the slide. And the seller did say that the hose might need replacing. But it was so cheap compared to anything else and I'd never heard of WP having made one before so couldn't resist. 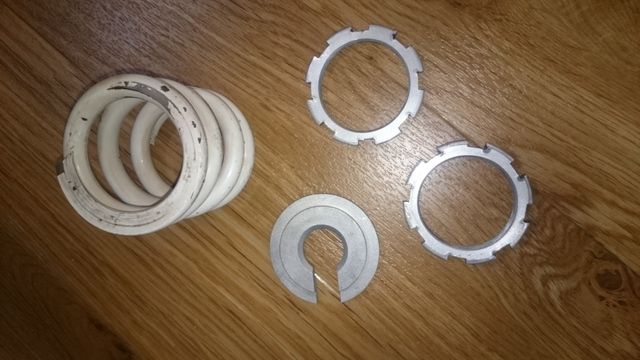 Having located a shock all I need to do was to get it bike ready. And to do so I took it down to MH Racing for inspection, he was surprised to see the shock as he didn't know WP did one but confirmed it was a good choice and that it was salvageable if I wanted it serviced. But I told him no, I didn't want it serviced, I wanted it like new. 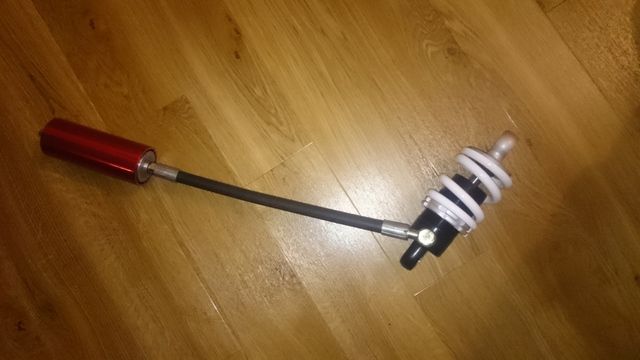 And I've got to say I think he's done a wonderful job. 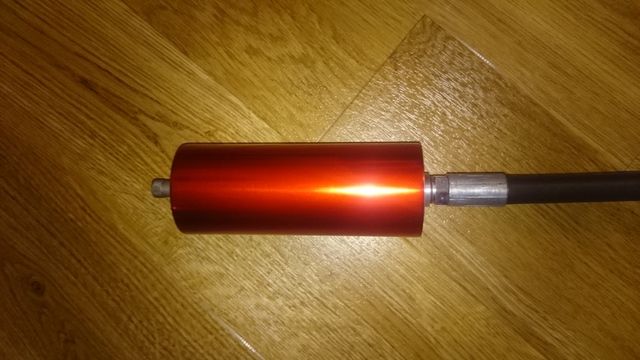 The hose was replaced as it just spurted oil out as soon as it was pressurised. Tracking down the internal seals took some time but a kit for another shock fitted it nicely. The bump stop he had to make. The body was painted, the reservoir re-anodised, and the spring powdercoated. The rest was aqua blasted and finished off on to a high standard. 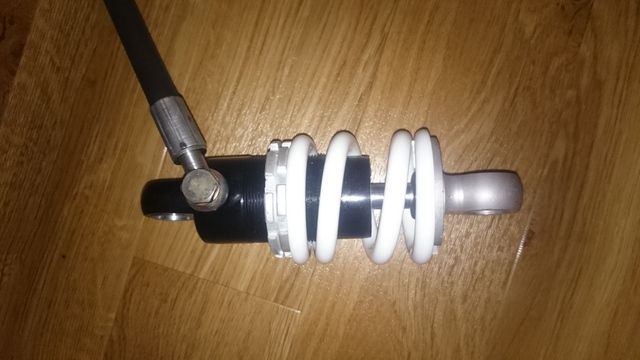 The observant might notice that the reservoir has swapped sides, this is a combination of accident and design. Rooting the hose on test fittings was interesting, but I have an idea. Just got to get it on the bike proper now. |
|
|
|
|
22-01-17, 01:41 AM
|
#54 |
|
Member
Mega Poster

Join Date: Jun 2011
Location: Cramlington Northumberland where we are truely blessed
Posts: 1,385
|
Very nice attention to detail.
__________________
used to be littleoldman but forgot password due to failing memory |
|
|
|
|
22-01-17, 08:18 AM
|
#55 |
|
Member
Mega Poster

Join Date: Mar 2007
Posts: 9,096
|
Sweet
__________________
We're riding out tonight to case the promised land Make everyday count RIP Reeder - Jolly Green Giant and comedy genius |
|
|
|
|
22-01-17, 03:24 PM
|
#56 |
|
Member
Mega Poster

Join Date: Mar 2010
Location: Mid Wales
Posts: 2,488
|
Lovely job!
|

|
|
|
04-02-17, 08:45 PM
|
#57 |
|
Member
Mega Poster
Join Date: Apr 2005
Location: Sunny Swindon
Posts: 3,570
|
About a week after dropping the frame off at Bristol Motorcycle Powder Coating the same outfit I used for the TZR, I get a call to say come and collect it, so I did. Top quality as before, I'd recommend them.
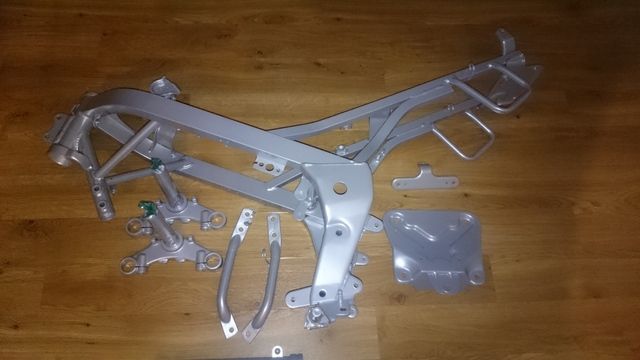 Now the observant among us might notice that there are 2 yokes (they came with a spare set of forks), some plates (these are from the seat unit and are the seat and back pad base), and the fork lowers which are just out of shot. Oh and that there is no swing arm, there is a very good reason for this... 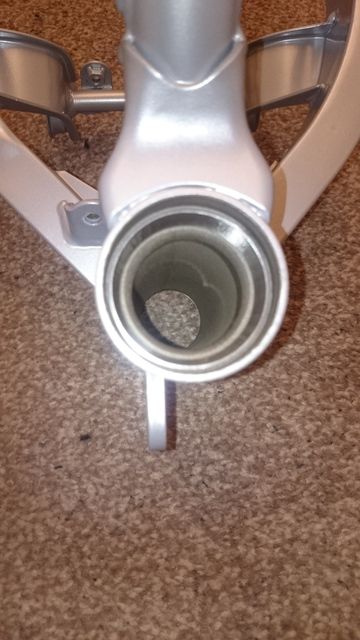 First thing to do is stick the races back in the frame. These come from a set of All Balls Racing tapered bearings. 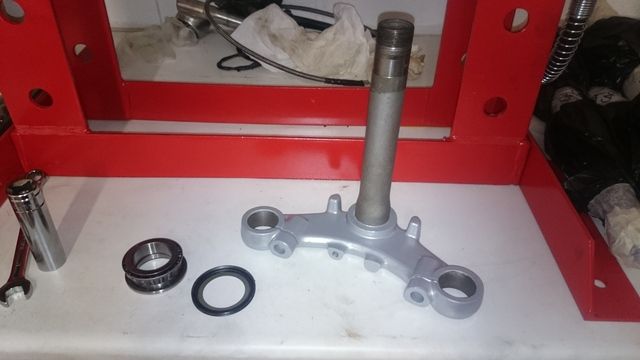 Then to put the lower bearing on the yoke. This is the first time I've done this so after a little YouTube research I lubed up the bearing, placed the dust seal on the yoke, slid the bearing on, and then: 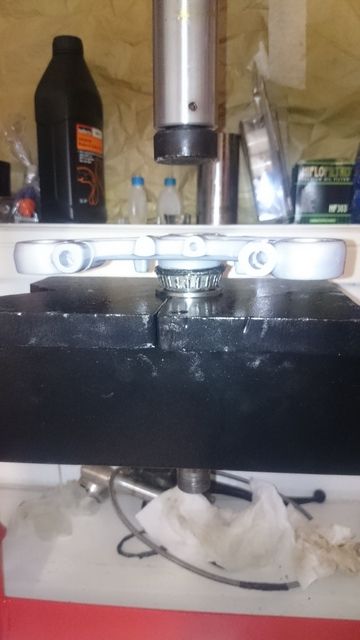 Turned the yoke upside down and using the original lower race so as not to work on the outer cage, press the new bearing onto the yoke. Worked out nicely. 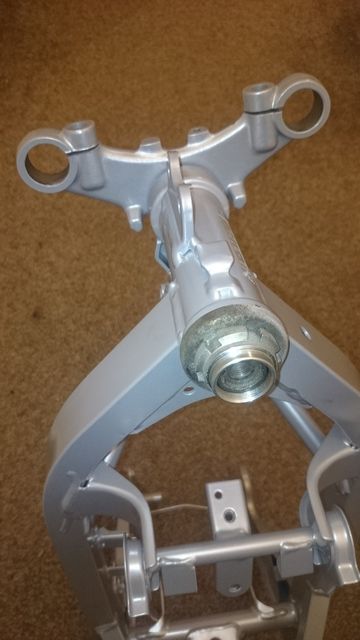 I've put the yoke into the frame but not tightened it up properly as I'll set the bearings later. I've also ordered a replacement top cover as this one is showing its age and has a little dent in it I didn't notice on disassembly. 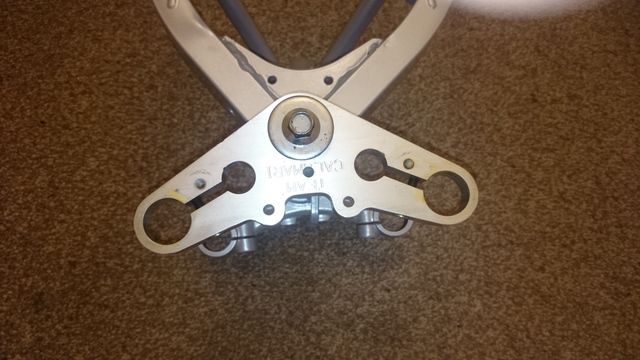 And then it was time for a test fitting of the Team Calamari Racing top yoke. Its a lovely CNC billet piece that came with a set of spare forks (more on them later). Unfortunately the previous owner has drilled a hole off centre through the TCR writing. I need to fix this, I have an idea don't worry. |
|
|
|
|
04-02-17, 09:09 PM
|
#58 |
|
Member
Mega Poster
Join Date: Apr 2005
Location: Sunny Swindon
Posts: 3,570
|
The reason the swing arm wasn't power coated was fairly simple, the stock arm is just well just that, stock and that isn't what I'm looking for. So imagine how happy I was when a 1.5" extended aluminium swing arm came up for sale via eBay in America.
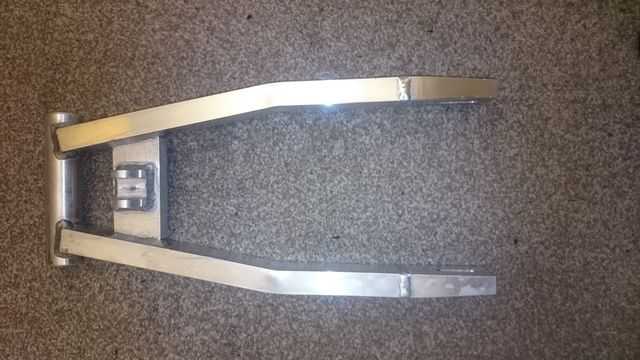 It's nice enough as it is, even with a couple of little marks where its been used before. All I've done is given it a little run over with some Autosol. 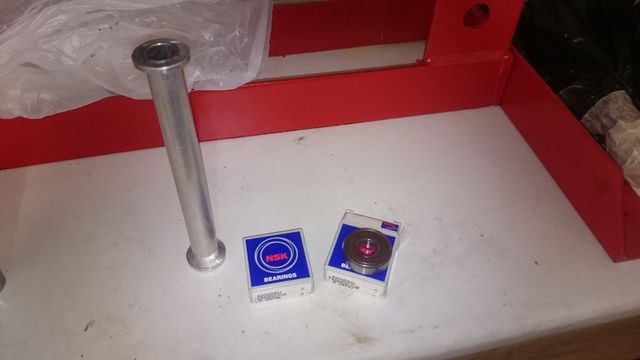 I noticed the bearings were some cheap made in China items so took them out along with the inner tube and replaced them with a set of NSK's. Got them from Swindon Bearings, and again used my press to put them in. 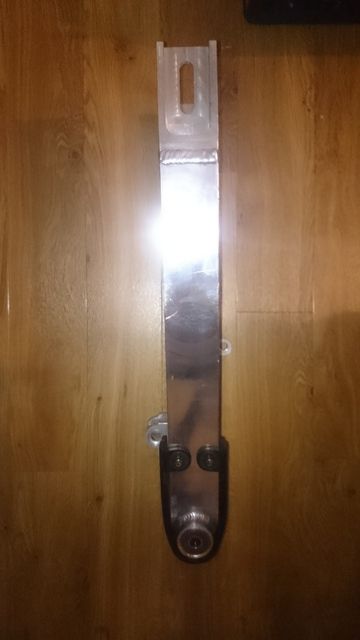 The chain guide is from the original machine as the one that was on the swing arm was cracked and split in a couple of places. Now all I need to do is put the arm into the frame.
__________________
"A little enthusiastic?" May I add here, GG is awesome and I think I am in love with Stretchie...he rocks my world! SH2 | 2MA | GROM | YSR Last edited by squirrel_hunter; 04-02-17 at 09:11 PM. |
|
|
|
|
04-02-17, 09:23 PM
|
#59 |
|
Member
Mega Poster
Join Date: Mar 2007
Posts: 9,096
|
sweet
__________________
We're riding out tonight to case the promised land Make everyday count RIP Reeder - Jolly Green Giant and comedy genius |
|
|
|
|
05-02-17, 02:07 AM
|
#60 |
|
Member
Mega Poster
Join Date: Apr 2005
Location: Sunny Swindon
Posts: 3,570
|
Back to the front forks. Thought I would rebuild them tonight, however I've discovered I haven't got replacement seals. I've ordered these now.
While I wait for them to arrive, I decided to do some measurements. If we cast our minds back a little to my annoyance with Yamaha for not putting springs in both fork legs it turns out I'm not the first to be troubled with this. TCR do a fork spring kit for the right fork. So some time ago I bought one. The kit is simplistic but then all the best ideas are. Its a metal rod and a spring of the same length as the left (I suspect this is an OEM spring). 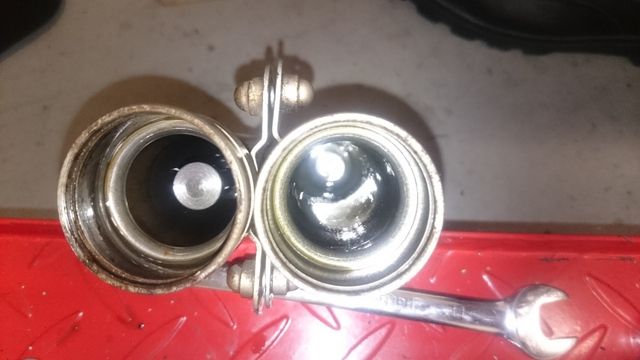 Looking at the picture into the fork bottoms, you can see one has a spring seat quite high up, this is the left sprung fork, and the right fork does have some sort of seat but its much further down the leg and this is the unsprung fork. The rod in the TCR kit sits on this seat to create a spring seat to match the left fork. So I put the rod in the right fork and compared it with the left. I could see straight away there was a difference so I started to measure. On the left there is a gap of 40mm from the spring seat to the top of the fork. With the TCR rod installed and measuring from the spring seat to the fork top there is a gap of 47mm. A 7mm difference. Please note its not the easiest thing to measure so lets give it a 0.5mm tolerance as that shouldn't be a problem. But is 7mm? 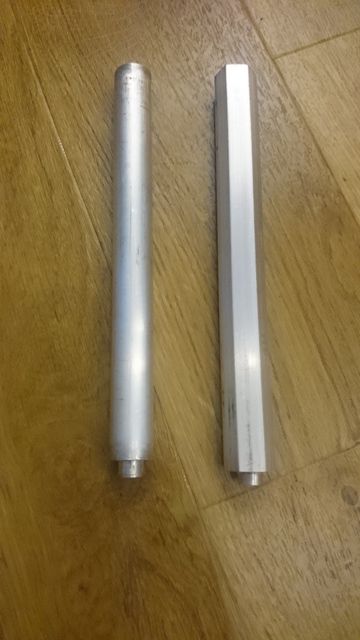 Now things get interesting. The spare set of forks I bought already had a right fork spring conversion in it. The rods clearly look different, the TCR one is the round bar, the other is a hex bar of unknown origin. However they are different lengths. The TCR rod is 159mm from base to spring seat, the other is 162mm from base to spring seat. But neither takes the right spring seat to the match the left. Oh and the hex bar base is not flat. I even checked the measurements on the other set of fork lowers and they come out the same. To me and my admittedly limited understanding of good suspension would say that you want both fork legs to be the same so they behave the same. So you would want both forks to have springs in them and for them to be the same length. And with the conversion installed I would have springs in both but not at the same length. Does this give me a problem to solve? 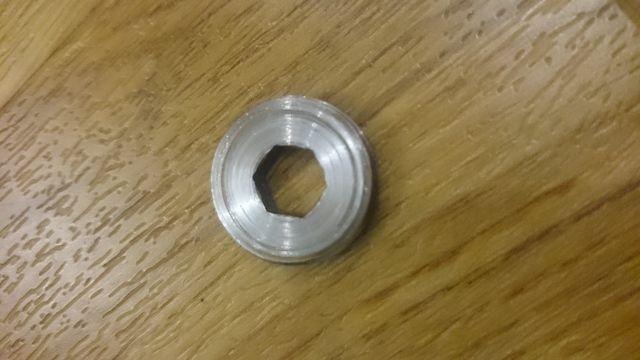 And now things get more interesting. In the left fork there is an upper spring seat. But in the right according to the installation guide this is not needed. In fact the installation instructions tells you to remove this spring seat from the left fork and discard it. Now I suspect this upper spring seat acts as a way of preventing the spring from moving when it shouldn't and possibly as some sort of preload. Without the upper spring seat the fork top bolt acts as the spring seat, and even if I wanted an upper spring seat the other set of forks didn't contain one and the part is no longer available from Yamaha. And now things get even more interesting. According to the instructions the left fork should have 125cc of oil in it and the right 110cc. Does this difference account for the 7mm difference in spring seat height? If I compare it to the Yamaha service manual the left fork should have 126cc of oil and a 146mm air gap. Obviously the right oil level isn't comparable from Yamaha, but if you have decided to convert the right fork to match the left then wouldn't it make sense to have the same oil in both. So in summary: do I need to find a rod with a spring seat to match the left as well as an upper spring seat and the same oil and air gap in both forks, or do I follow the TCR kit instructions? |
|
|
|
 |
|
|
 Similar Threads
|
||||
| Thread | Thread Starter | Forum | Replies | Last Post |
| My new project | mister c | Photos | 121 | 06-07-12 02:54 PM |
| YC's next project | davepreston | Idle Banter | 8 | 29-06-12 05:19 PM |
| New Project | hardhat_harry | SV Talk, Tuning & Tweaking | 15 | 24-01-11 06:56 PM |
| The FZR project | Holdup | Bikes - Talk & Issues | 11 | 10-05-09 03:29 PM |
| Project TLS | PAPPACLART | Photos | 65 | 15-08-07 09:14 PM |

