 |
 |
 11-01-10, 08:45 PM
|
#1 |
|
Guest
Posts: n/a
|
Hi all has anybody got a ecu restrictor (33bhp) for a curvey W reg for sale please
its for a friend of mine who has no computer so i thought i would try and help him out . |

|
|
11-01-10, 09:29 PM
|
#2 |
|
Member

Join Date: Mar 2008
Location: Trowbridge, Wiltshire
Posts: 490
|
You can't get an ECU restrictor for the curvy, it's a carbed bike. You need restrictive washers fitted. Also this is the 'for sale' section.
|

|
|
|
11-01-10, 09:34 PM
|
#3 |
|
Guest
Posts: n/a
|
Sorry about that how do i delete the message
|
|
|
|
11-01-10, 09:43 PM
|
#4 |
|
Member
Mega Poster

Join Date: Jul 2008
Location: Sheffield
Posts: 10,274
|
A moderator'll be along soon I would have thought. As spike nipple says for the curvy your mate needs some restrictor washers for the carburettors.
__________________

|
|
|
|
|
12-01-10, 12:37 PM
|
#5 |
|
Member
Join Date: May 2006
Location: Newcastle
Posts: 872
|
This link will help you out hkhksh:
http://forums.sv650.org/showthread.php?p=2124284 Don't forget to check what your insurance company needs as proof if anything |
|
|
|
|
12-01-10, 04:45 PM
|
#6 | |
|
Guest
Posts: n/a
|
Quote:
|
|
|
|
|
13-01-10, 04:53 AM
|
#7 |
|
Guest
Posts: n/a
|
Here's where they go!
Thanks to Ricardo (TSM) for the 'How to' How to de-restrict a Mk1 SV I am going to best explain how i have de-restricted my bike which was fitted with a genuine Suzuki restriction kit. WARNING - This is only for people that hold an unrestricted licence, if not you will be breaking the law. Also this has been done to the best of my knowledge, whatever you do to your bike is your responsibility and if you are in any doubt with these instructions do not carry out the procedure. PS. To the gurus, if there is any gaping problems with this please tell me so I can amend the instructions. Step 1 - Airbox removal Remove front seat, remove two bolts at the headstock that hold the fuel tank down, prop tank up with tool provided under rear seat, exposing the air box. 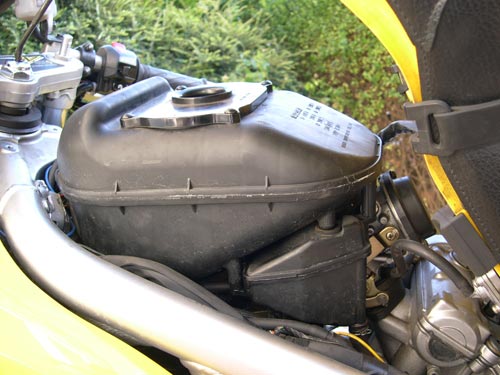 Disconnect both breather pipes from the air box, use long nose pliers to move the clips. With a firm tug of the air box, this should free the box exposing the carb below. 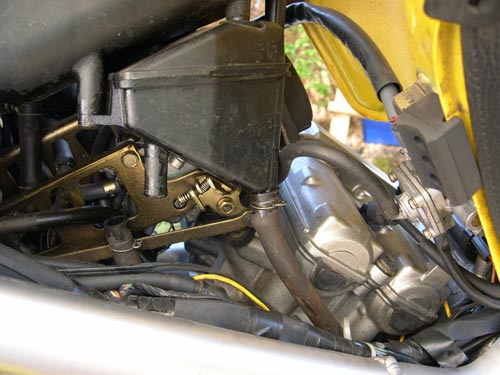 Step 2 - Fuel Feed & Throttle Position Sensor Disconnect & Idle Cable I found that it was easier to remove various Fuel/Sensors/Idle Cables, so that access to the carb covers is easier. The idle adjust knob has to be unclipped from its holder on the left side of the bike. Disconnect Fuel Feed 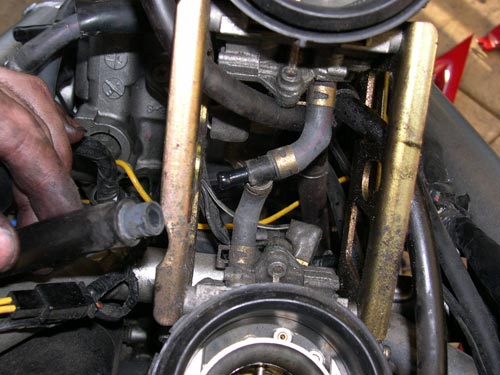 Disconnect Throttle Position Sensor 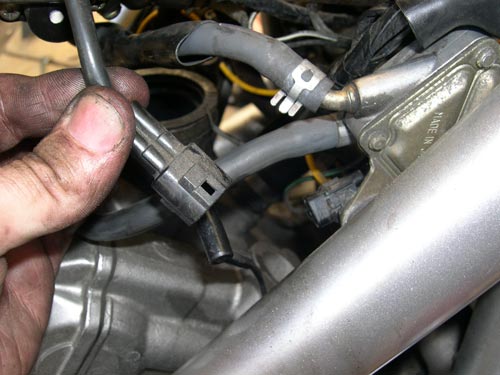 Step 3 - Slacken intake duct clamps / Carb removal To gain easy access to the front & rear carb covers we need to remove the carbs from the engine intake ducts. Rear carb - Between engine & Carb 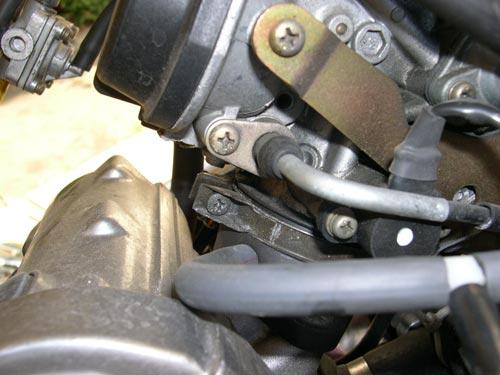 Front carb - Between engine & Carb, Radiator needs to be moved to access clamp. 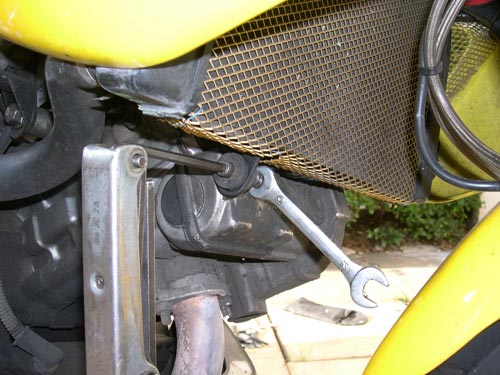 Once both the intake duct clamps have been slackened then pull the carbs up by the gold side bars and move to side. 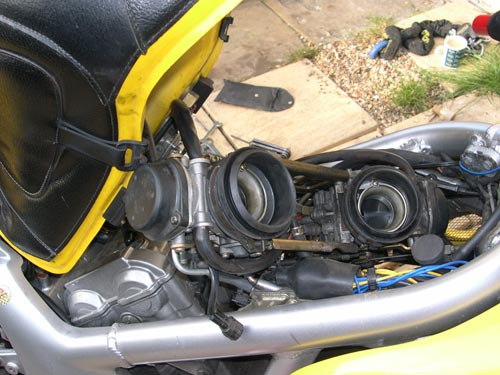 Step 4 - (Optional) Front carb choke removal To ease access to front carb cover i decided to remove the front carb choke plunger. 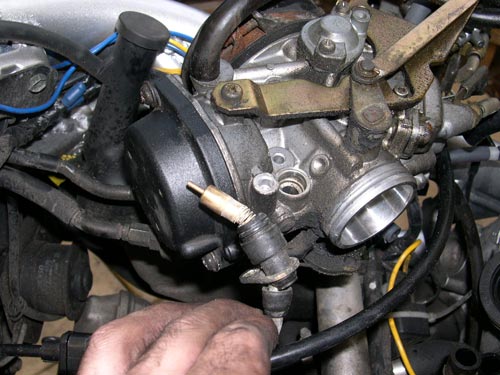 Step 5a - Part 1 of Removal of restriction kit This section is the same for the front and rear carbs. Be very careful not to let any of the spring fly off in this section Remove the two screws holding the black cover on the carbs. 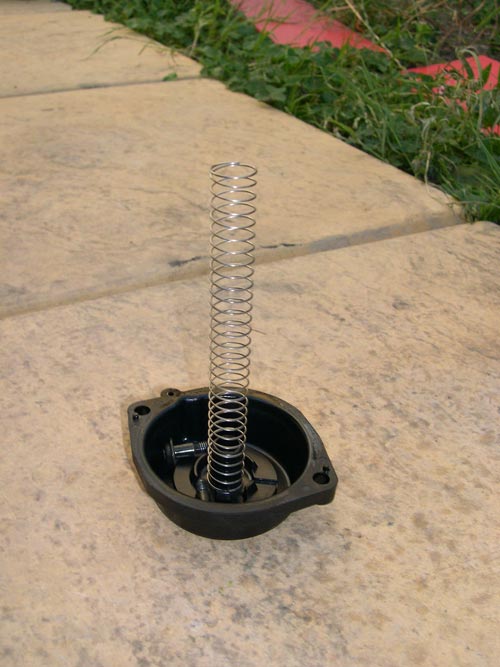 On removal of the carb cover you will see the diaphragm & piston assembly, remove this carefully so not to damage. 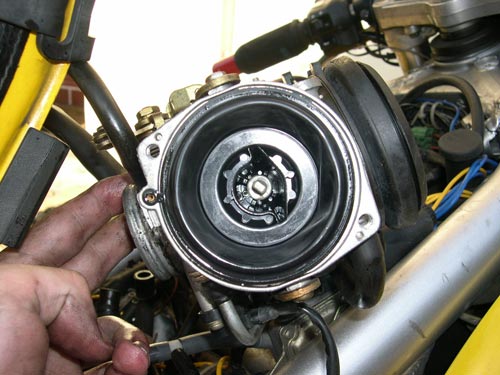 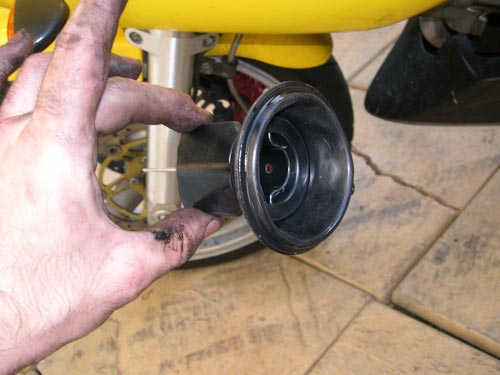 Step 5b - Part 2 of Removal of restriction kit Remove the Jet needle from the piston, as you look into the end of the diaphragm & piston assembly you should see a small grey retainer. Using a long nose pliers, pull and remove. (Be careful because there is a very small spring and washer that will come out). What the Jet needle set should look like. 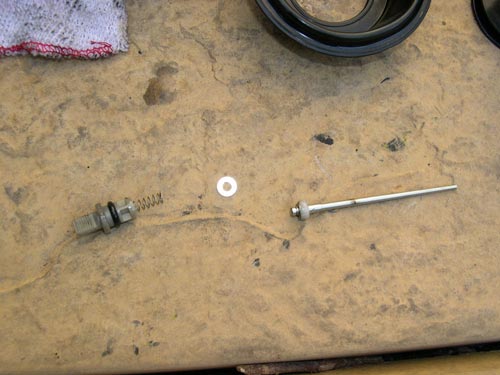 Remove the diaphragm from the plastic piston, very carefully so not to damage. As you can see in the picture of the pistons without the diaphragms, the one on the top is the restrictor (with the small hole at the base) the bottom one is the original one which will give you full power. 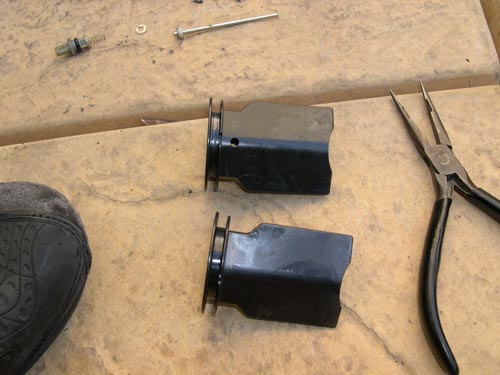 Step 5c - Fit original kit Put diaphragm onto original piston, noting that the diaphragm has to be the correct way around or it will not seat into the carb correctly. Re-assemble the Jet needle as it was removed, needle first with washer on the top then spring then retainer. Place the assembled unit back into the carb. Note that the needle has to be aligned with the small hole on the other side of the carb inlet. 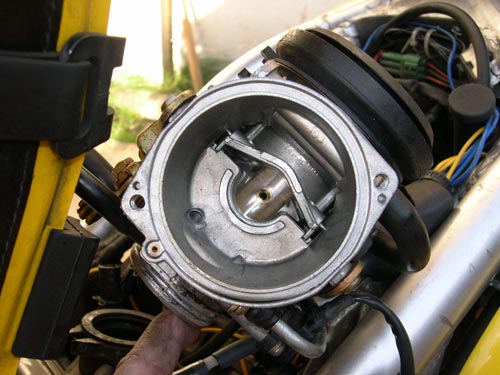 Once in place place the carb cover in place, be careful to make sure it seats properly with the diaphragm, screw cover back on. Step 6 - Put carb back onto engine Follow in order Step 4 to Step 1, reversing all actions to reattach carbs to engine. Fit air box and make sure that all the breather pipes are attached correctly. |
|
|
|
13-01-10, 06:14 AM
|
#8 |
|
Guest
Posts: n/a
|
I never needed to touch the radiator.
|
|
|
 |
|
|
 Similar Threads
|
||||
| Thread | Thread Starter | Forum | Replies | Last Post |
| 33bhp restrictor kit - where from? | svchris | SV Talk, Tuning & Tweaking | 0 | 10-07-09 09:24 AM |
| 33bhp restrictor kit and more! | Dave20046 | Stuff Wanted | 20 | 11-10-08 05:31 PM |
| 33bhp restrictor kit for SK4 | [JP] | Stuff Wanted | 5 | 29-08-08 04:48 PM |
| K6 33bhp restrictor kit | Cyberhell | For Sale - SV's and SV related items | 2 | 27-08-08 10:57 AM |
| 33bhp restrictor | matt_t29_mpt | Stuff Wanted | 0 | 19-05-08 07:29 PM |

