 |
 |
| SV Talk, Tuning & Tweaking Discussion and chat on all topics and technical stuff related to the SV650 and SV1000 Need Help: Try Searching before posting |
 |
|
|
Thread Tools |
 02-04-07, 09:28 PM
|
#1 |
|
Guest
Posts: n/a
|
Howdoo!
I did the tail tidy thing on my curvy recently. I used the most excellent instructions and template provided on the Scottish SV site http://www.sv650.tk/ The only major problem I encountered was getting the rear light assembly and CDI box out. My sockets are simply too big to get in there. At first, it looks like you definitely have to get the ignition control box and rear light out before you can start cutting the rear plastics off. However, such is not the case... If you start cutting with a close-quarters hacksaw from the back, towards the front, just above the indicator mounting, then you can simply pull the plastics down to reveal the screws that hold the CDI in place. No fiddling with tiny sockets required! Also... The guide on the Scottish site suggests removing the rear plastics all the way to the crease in the undertray just behind the forwardmost toolkit rubber strap clip. Doing this means that you lose the ability to use the rubber strap having lost the rear clip. This is not necessary. You only need to cut to just behind the rearmost rubber strap clip. This is really beneficial because it means that you can still use the rubber strap to hold the CDI box afterwards. And you can bolt your numberplate bracket to the original undertray plastics and not just your custom aluminium plate. Much stronger! If this is of interest to anyone then let me know and I'll take pictures of what the heck I am on about here! ") 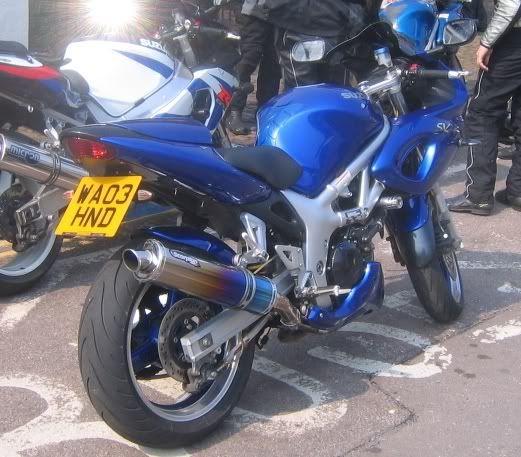
|

|
|
02-04-07, 09:33 PM
|
#2 |
|
The Sick Man
Mega Poster

Join Date: Nov 2004
Location: Peckham.SE.LDN
Posts: 4,768
|
I have done the same but moved the CDI into the side panel where the alarm is, that way i have nothing taking up space under the rear seat. I prefered doing the cutting without the fairing incase it got damaged which i think is the best way.
__________________
OTR: KTM 690 Duke R 2015 Full Akro SIDELINE: Kwak ZX636 A1P 2002, Red, R&G's, Yoshi, Double Bubble Screen GONE: Kwak ZX-7R P1, Full Akro, Undertray, Screen GONE: SV650S K2 Very Bruised & Without Fairing, Motovation Frame Sliders, R&G Ally Sprocket Toe Protector, HEL 2 Line Setup, GSXR K1 600 RWU Forks, Barnett Clutch & Springs, Penske 8981 Shock, Gilles Ti Rearsets, Steel Barends, Scottoiler, AFAM Chain & Sprockets, Twin FIAMM Horns, Skidmarx Bellypan, Full Micron Zeta Steel System, Cut down undertay. Forum Problems & Information / Site Suggestions |

|
|
|
02-04-07, 10:03 PM
|
#3 |
|
Guest
Posts: n/a
|
that looks great phil, would like to see some close up pics, I'm not sure whether to do this or do just what hovis did.
did you use the same motrax plate holder? |
|
|
|
03-04-07, 11:56 AM
|
#4 |
|
Guest
Posts: n/a
|
Looks sweet I want a tail tidy for my curvy but i couldnt find anyone who will make em!
Er sorry whats a CDI? (Hangs head in shame for a obvious answer) |
|
|
|
03-04-07, 01:02 PM
|
#5 |
|
Guest
Posts: n/a
|
I have done the same, but I made it myself by using this model: http://aeltermanwouter.googlepages.c...eliminator.jpg
 Also made my own licenceplatehanger out of an aluminium plate of 3mm thickness. I've put the cdi to the same place as it was befor, just had to drill some holes. It has been 2 years now since I've done it and it's still not broken or something, maybee need to repaint it. |
|
|
|
03-04-07, 06:35 PM
|
#6 |
|
Guest
Posts: n/a
|
I like that fisrt piwant to tidy up my bikes ass end
so I need an undertray >> ? and an rse end hangar yea?. its all money isnt it. whats the best colour coded undertray then? I done a search cant get a complete answer. and are they hard to fit? |
|
|
|
03-04-07, 07:15 PM
|
#7 |
|
Guest
Posts: n/a
|
I also used the scottish site to do mine, however i did have the nightmare of getting the tail light out and which resulted in me removing the rear plastics
Was all made worth while in the end as i'm a complete numpty when it comes to anything mechanical. I ended up fitting the LED's for a number plate light and used the rsend number plate bracket. If you do use the template off their site i'd check the scale as and when you print it out. Template cut out  Mini indies n bracket  Before with the snow plough..then plucked up the courage to attack it with the dremmel  After the hard work was done and the led's wired in  Bracket n indies fitted  The finished article, slightly smaller plate than i anticipated      Moral of the story.....if i can do it then any bugger can |
|
|
|
03-04-07, 07:43 PM
|
#8 |
|
Guest
Posts: n/a
|
That also looks sweeeeett!!!
Hmmm, Where can i get aluminum plate from? And the LEDs? How do you wire them up and where too? |
|
|
|
03-04-07, 07:56 PM
|
#9 | |
|
Guest
Posts: n/a
|
Quote:
 Also the same for the indies |
|
|
|
|
04-04-07, 06:56 PM
|
#10 |
|
Guest
Posts: n/a
|
Think me and my mate are gonna have a go at this soon, I printed out the template on A3 paper today, second attempt got the scale perfect
Plus at the mo we working right next door to a engineering place with a skip full of ali! I need to get a couple of those Rsend's then! |
|
|
|
| Thread Tools | |
|
|
 Similar Threads
|
||||
| Thread | Thread Starter | Forum | Replies | Last Post |
| Curvy tail skirt or tail tidy | mouldy | Stuff Wanted | 3 | 21-02-09 12:49 PM |
| Curvy Tail Tidy? | adam123 | SV Talk, Tuning & Tweaking | 11 | 04-03-08 04:34 PM |
| tail tidy for curvy? | muffin | SV Talk, Tuning & Tweaking | 56 | 31-12-07 09:03 PM |
| curvy tail tidy?? | garyh74 | SV Talk, Tuning & Tweaking | 1 | 07-08-06 05:35 PM |
| Tail tidy for curvy SV | c_noble | SV Talk, Tuning & Tweaking | 8 | 16-06-06 09:15 PM |


