 |
 |
Idle Banter For non SV and non bike related chat (and the odd bit of humour - but if any post isn't suitable it'll get deleted real quick). There's also a "U" rating so please respect this. Newbies can also say "hello" here too. There's also a "U" rating so please respect this. Newbies can also say "hello" here too. |
 |
|
|
Thread Tools |
 13-12-14, 05:28 AM
|
#11 | ||
|
Member
Mega Poster

Join Date: Feb 2007
Location: Crewe, Cheshire
Posts: 2,317
|
Quote:
 Quote:
__________________
Flickr: http://www.flickr.com/photos/croozenooze/ Facebook : https://www.facebook.com/colin.hughes.1213?ref=tn_tnmn Yoo Toob https://www.youtube.com/channel/UCjG...eMWUx4Ud2dK-yA |
||

|

|
|
13-12-14, 05:59 AM
|
#12 |
|
Member
Mega Poster
Join Date: Feb 2007
Location: Crewe, Cheshire
Posts: 2,317
|
So, with the rear end sorted, it was time to move onto the front. 2 sets of forks were completely knackered, so it was time to think about getting a set rechromed. I then remembered that I had another set in my box of spares, so unwrapped them out of their bin liners. They were in pretty good condition, couple of pit marks, but very useable. I had previously ordered some new fork seals & headrace bearings ready for the build, so set to stripping the forks down.
The big thing in the 80's was Anti Dive, which, from what I heard, didn't really work anyway, but a good selling point I would have thought. The seals were shot at on 1, so robbed them off one of the other sets of forks. Knackered seals at the top "new" ones at the bottom.    Now it was time to attack the fork seals. 30 years of abuse had taken their toll, boy were they a pain to come out! One set of scrap fork legs.  Good job I have 2 other sets lol. Time to fit on the yokes "triples". I greased up the new bearings, but found them very difficult to fit, which I haven't sorted properly yet. The front end will have to come off again & I'll do a bit of sanding on the powder coat.  I also cleaned up the clocks with good old Auto Glym. I was astonished at how well it brought life back to the plastic. It comes in handy having a mate that owns a valeting company for that piece of advice Before.  After.  So, forks painted, clocks & yokes fitted, we're getting to see a rolling chassis at last.  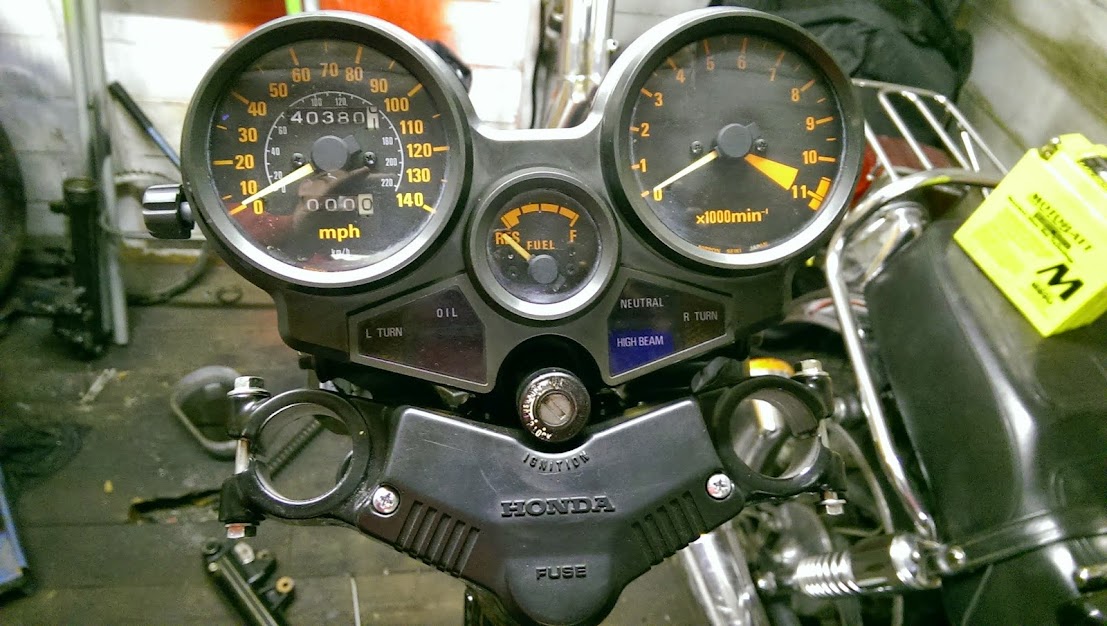
__________________
Flickr: http://www.flickr.com/photos/croozenooze/ Facebook : https://www.facebook.com/colin.hughes.1213?ref=tn_tnmn Yoo Toob https://www.youtube.com/channel/UCjG...eMWUx4Ud2dK-yA Last edited by mister c; 13-12-14 at 07:48 AM. |
|
|
|
|
13-12-14, 10:59 AM
|
#13 |
|
Member
Mega Poster

Join Date: Jun 2009
Location: Durham
Posts: 2,669
|
Superb, a build thread at last
__________________
Black naked 1999 sv650 which im trying to keep happy Custom paintwork Saragon Customs Spray painting Electrical fault finding guide and Regulator rectifier test Only a biker knows why a dog sticks his head out of a car window. |
|
|
|
|
13-12-14, 11:35 AM
|
#14 |
|
Member

Join Date: Dec 2012
Location: East Yorkshire
Posts: 801
|
Yea another great build thread, cracking job so far.
__________________
http://www.pegdownracing.com/ Want a Gyrocam for your track / road / racing videos? Gyrocam here! Bikes: Minitwin SV650 '04. Click me! SV650 (Now Nekked!) '04. Pictures here! |
|
|
|
|
13-12-14, 04:33 PM
|
#15 | ||
|
Member
Mega Poster
Join Date: Feb 2007
Location: Crewe, Cheshire
Posts: 2,317
|
Most of the large parts were starting to look quite good. i was wondering when something was going to go wrong. Well, the engine was going to be the subject of a lot of head scratching (& to be honest, still is). Before I started the strip down it was imperative that the engine ran. I didn't want to waste a shed load of money & time doing this thing up if the engine was knackered. So, with the bike being stood for over 5 years, stale fuel, old plugs & oil, it was time to fire it up, if it would. My son & I checked a few things out before cranking it over & all seemed fine. I fitted the battery off my other half's 125, she wasn't doing anything with it anyway, turned the key & cranked the engine over with the kill switch set to off to get a bit of oil circulated. Then, with a bit of trepidation I hit the button & left it depressed for a little while. We had a cough, cough, splutter splutter, then she fired into life with a massive cloud of smoke.
So, I knew the engine ran, I thought I was being clever by just cleaning & painting the motor, polishing the rocker & generator covers & fitting new spark plugs. BIG mistake! My son came down to give me a hand fitting the engine, it took a while, but she went in & looked really nice.   I fitted most of the electrics after a lot of cleaning up & checking to see if everything worked. We now have what looks like a motorbike. Footpegs cleaned & fitted too.    I was having a real problem with the rear brake master cylinder, they are as rare as rocking horse droppings & both of mine were siezed solid. Even started looking at alternatives, which were few & far between. I did find a CBX1000 new one for only £700 +VAT I had soaked one in WD40 for weeks, but still couldn't move the piston inside, so gave up. I found one on EBAY for £40, so snapped it up. The rubber seal was broken, so thought I'd order a new piston kit from David Silver Spares, only £55.00 lol. While I was waiting for it to arrive, I had a play with original cylinder. I drilled a hole into the old piston, took a long self tapping screw, screwed it into the piston, put the screw in the vice & tapped the cylinder with a mallet......... Hey presto 
__________________
Flickr: http://www.flickr.com/photos/croozenooze/ Facebook : https://www.facebook.com/colin.hughes.1213?ref=tn_tnmn Yoo Toob https://www.youtube.com/channel/UCjG...eMWUx4Ud2dK-yA Last edited by mister c; 13-12-14 at 05:22 PM. |
||
|
|
|
|
14-12-14, 01:46 AM
|
#16 | |
|
Member

Join Date: Feb 2008
Location: Appalachia
Posts: 419
|
Quote:
It was all going too well up to this point. What's up with the engine???
__________________
...Bill "The Mountains are calling and I must go" |
|
|
|
|
|
14-12-14, 07:12 AM
|
#17 | |
|
Member
Mega Poster
Join Date: Feb 2007
Location: Crewe, Cheshire
Posts: 2,317
|
Quote:
Forgot I had this picture. This was the rear master cylinder when it came off the bike.  I turned to the brakes next. i had already cleaned up the discs, but now turned to the calipers. I purchased a new set of stainless brake lines with black covers to keep with the "standard" look. I filled the master cylinders with fluid & bled the brakes to see how badly siezed up & rusty they were, again I was really surprised, they were in pristine condition. After cleaning 30 years of crud out of the calipers I noticed this on one of the front calipers.  Time to root through my box of bits & turned up another front right hand caliper. Re bled the system, pumped out the pistons, cleaned & re-fitted &, hey presto, we now have front brakes All cleaned & ready for copper grease.  All fitted & looking nice. Time to fit the covers.  Rear brake fitted.  One problem I did come across here was that the brake kept catching & I couldn't understand why. After a lot of head scratching I found that the front & rear pad retaining pins were a different length. It took me ages to find it too  . .  I walked into the shed the following morning & found a pool of brake fluid on the floor. The front master cylinder was leaking quite badly, so it was back onto Ebay on the hunt for another one. I found a Chinese copy for £20 & thought "now, do I trust it, or buy a 2nd hand one?". After looking on David Silver's website, I bought it. He had the same one on his site for £30, so they must be ok.   So, it was time to fit the exhaust. I contacted Motad to see if I could still buy the cones that hold the downpipes to the engine. "yes sir, it's part number blah blah blah & they cost £6 each". "I'll take 4 please". Happydays  So, I cleaned up the oil cooler & pipes, refitted it.  New oil filter fitted (was in my box of bits  Cleaned up the exhaust holders   And refitted the exhaust. I was getting really excited at the prospect of starting the bike up now. 
__________________
Flickr: http://www.flickr.com/photos/croozenooze/ Facebook : https://www.facebook.com/colin.hughes.1213?ref=tn_tnmn Yoo Toob https://www.youtube.com/channel/UCjG...eMWUx4Ud2dK-yA |
|
|
|
|
|
14-12-14, 08:21 AM
|
#18 |
|
Member
Mega Poster
Join Date: Jun 2009
Location: Durham
Posts: 2,669
|
Looking really good so far
__________________
Black naked 1999 sv650 which im trying to keep happy Custom paintwork Saragon Customs Spray painting Electrical fault finding guide and Regulator rectifier test Only a biker knows why a dog sticks his head out of a car window. |
|
|
|
|
14-12-14, 08:42 AM
|
#19 |
|
Member
Mega Poster
Join Date: Apr 2011
Location: essex
Posts: 5,314
|
I vaguely remember the cbx.
Well I did like the look of the 750 in black. Nice job there.
__________________
Raisin cookies that look like chocolate chip cookies are the reason I have trust issues. |
|
|
|
|
14-12-14, 02:06 PM
|
#20 | ||||
|
Member
Mega Poster
Join Date: Feb 2007
Location: Crewe, Cheshire
Posts: 2,317
|
Cheers guys.
Right, it was time to fire the old girl up again. I was very disappointed to say the least. Time for a top end strip down. I had a suspicion it was valve guide oil seals after being stood for so long. Back onto Ebay & purchase a gasket set & start to strip the engine. I have repaired single cylinder machines & multi cylinder 2 strokes, but never a DOHC 16 valve in line 4, so this was going to be a massive education. Seeing as I was taking the head off, I thought that I would check the cylinders & piston rings for wear, so it made sense to buy a Glazebuster & hone the cylinders while it was apart.  So, out came the haynes manual & I set to work. Truth be known I was cacking myself, but, if the worst happened, I'd got 2 spare engines to play with. It came apart quite easily, but there was something that didn't make too much sense, the timing was miles out, so how it ran, I'll never know.  Never mind, I'll sort that when I rebuild it. I removed the camshafts & laid everything on the bench in the order it came off the bike.  So I removed the head & slid the barrels off the pistons to have a nosey, again, for a 60000 mile engine, it looked fine  I checked the piston ring gaps too, they were in tolerance . 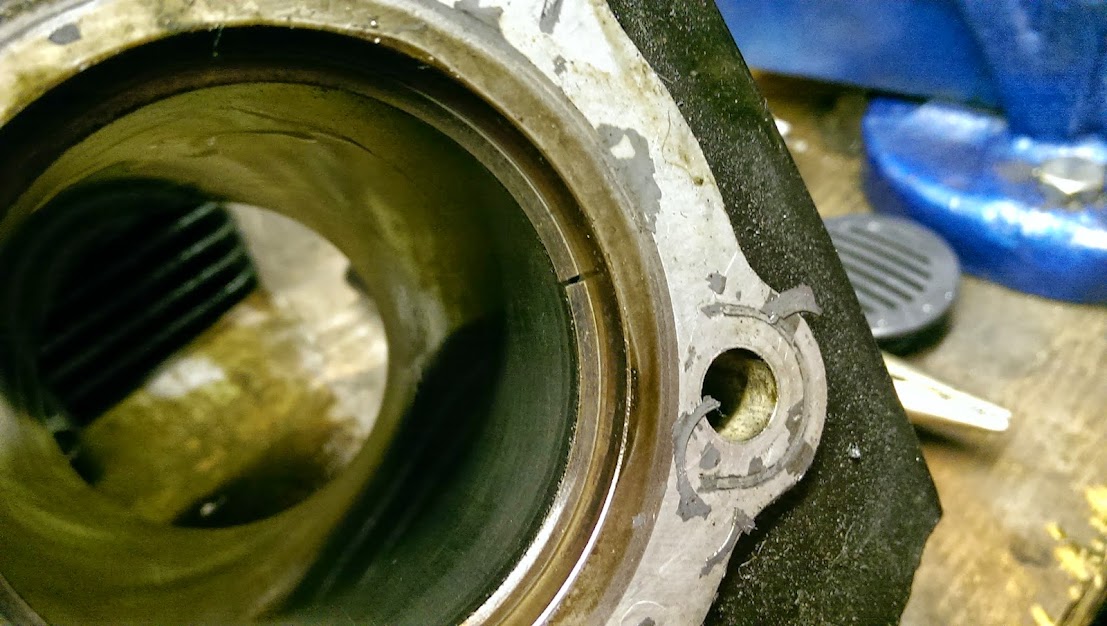 So, set the glazebuster into operation & whizzed it up & down the barrels a few times. 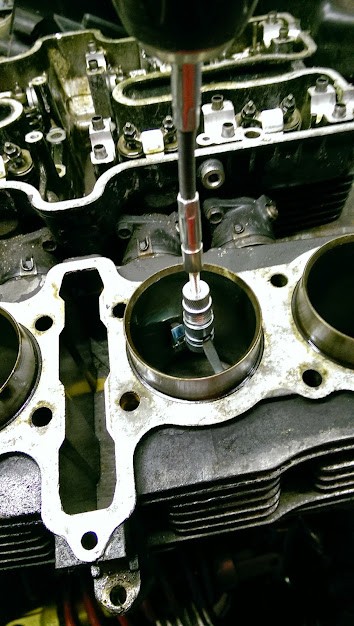 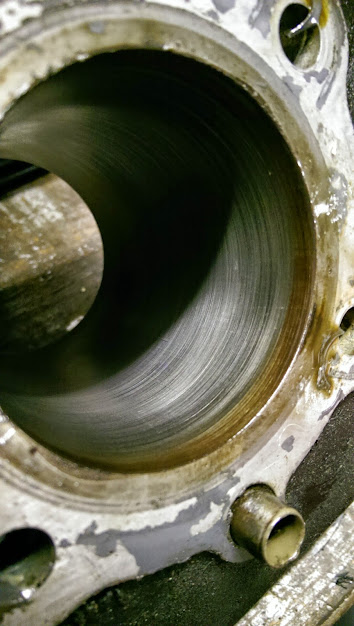 & started to replace the barrels.  Now it was time for the fun. I bought a Valve spring compressor to make the job easier & also some valve grinding paste & tool for the job.   Time to fit the head back on. This turned out to be a lot harder than it coming off. Part of the frame seemed to be in the way, so needed some serious coaxing with a very large screwdriver, hammer & a lot of swear words. I did it in the end though. When I was refitting the cams i noticed that the rev counter drive was in a bad way, so knicked the one off my spare motor that was under the bench.  I had replaced all of the old valve guide oil seals which was a fiddly job in itself, but would be worthwhile in the end. It was time to refit the head, reset the valve clearances & timing, then tighten everything up    I refitted the carbs & tried her out to see if my work was a success, or whether it would go bang lol. She runs! & quite sweetly, but again, I was gutted, she still smokes Now, what I'm hoping is that it's the residual oil from me taking it to pieces & coating things with oil as I rebuilt it. If not, then I am going to be doing some serious head scratching because I haven't got a clue what it is. I've also taken the carbs off because I found it difficult to have a mess with the mixture screws. The 2 outer screws are solid, so that's another thing I need to fix. The wonders of playing with a 30 odd year old bike So, this is where I'm up to at the moment. I have a smoky engine & siezed mixture screws & have lost my mojo slightly. That is 1 good thing about rebuilding your own project, you can leave it for another day when you feel in the mood....... Watch this space
__________________
Flickr: http://www.flickr.com/photos/croozenooze/ Facebook : https://www.facebook.com/colin.hughes.1213?ref=tn_tnmn Yoo Toob https://www.youtube.com/channel/UCjG...eMWUx4Ud2dK-yA Last edited by mister c; 14-12-14 at 02:13 PM. |
||||
|
|
|
|
|
|
 Similar Threads
|
||||
| Thread | Thread Starter | Forum | Replies | Last Post |
| Bit of a restoration project. | RingDing | Bikes - Talk & Issues | 33 | 29-08-14 02:31 PM |
| Restoration project on: CB750 Supersport | Rai86 | Bikes - Talk & Issues | 11 | 18-05-10 01:43 PM |
| Honda C90 Restoration | the_lone_wolf | Idle Banter | 14 | 08-07-09 11:26 AM |
| New issue of Ride... Quite funny SV restoration project | northwind | Idle Banter | 6 | 18-05-06 06:28 PM |
| restoration | SV-Sexy-virgin? | Bikes - Talk & Issues | 5 | 17-04-05 09:48 PM |

